How to Install Cyberpunk 2077 Simple Menu: A Step-by-Step Guide

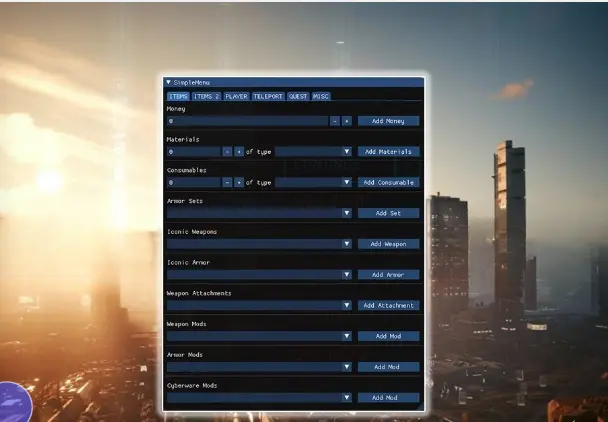
If you’re keen on enhancing your Cyberpunk 2077 experience, installing the Simple Menu mod is a must. This mod adds an intuitive in-game UI that opens up a new level of customization for your gameplay.
Installing the Cyberpunk 2077 simple menu is straightforward and doesn’t require extensive modding knowledge. It’s a process of downloading the right files and placing them in the correct directory. After installation, the mod integrates seamlessly into the game, offering a polished and user-friendly experience that allows for immediate enjoyment of the new features it unfolds.
In this post, we will explain how to download and install Cyberpunk 2077 simple menu to enhance your gaming experience.
System Requirements for Cyberpunk 2077 Simple Menu
Before you begin the installation of the Simple Menu mod for Cyberpunk 2077, it’s crucial to check that your system meets the necessary specifications. This will ensure the mod runs smoothly and provides the best possible experience.
Minimum Specifications
- Operating System: Windows 7 or Windows 10 64-bit
- Processor (CPU): Intel Core i5-3570K or AMD FX-8310
- Memory (RAM): 8 GB
- Graphics Card: NVIDIA GeForce GTX 780 3GB or AMD Radeon RX 470
- DirectX: Version 12
- Storage: An additional 50 MB on top of the base game’s requirements
Moreover, you must have Cyber Engine Tweaks installed before adding Simple Menu to Cyberpunk 2077.
Recommended Specifications
- Operating System: Windows 10 64-bit
- Processor (CPU): Intel Core i7-4790 or AMD Ryzen 3 3200G
- Memory (RAM): 12 GB or more
- Graphics Card: NVIDIA GeForce GTX 1060 6GB, GTX 1660 Super or AMD Radeon RX 590
- DirectX: Version 12
- Storage: At least an additional 50 MB of free space, having extra is beneficial for updates
Cyberpunk 2077 Simple Menu: Purchase and Download

Before installing the Cyberpunk 2077 Simple Menu Mod, you need to own a copy of the game. This section will guide you through choosing the right platform, completing your purchase, and downloading the game to prepare for mod installation.
Choosing a Platform
Cyberpunk 2077 is available on various platforms, including PC (via Steam, GOG, or Epic Games Store), PlayStation, and Xbox. Your choice should be guided by:
- The type of hardware you own
- The platform’s mod support (for PC modding is typically more accessible)
Completing the Purchase
Once you’ve selected a platform:
- Navigate to the platform’s store:
- For PC, visit the respective online store page.
- For consoles, use the built-in store application.
- Search for Cyberpunk 2077.
- Follow the on-screen instructions to complete the purchase.
Downloading the Game
After purchasing, the game will be added to your library. To download:
- For PC, click on Cyberpunk 2077 in your library and select Download.
- For consoles, go to your library or game management section and download the game from there.
Ensure you have enough storage space available, as Cyberpunk 2077 requires a significant amount of disk space.
Cyberpunk 2077 Simple Menu Installation Process
To successfully install the Cyberpunk 2077 simple menu mod, you’ll need to follow specific steps for PC installation. There is no available method for installing mods on consoles, as modding is typically restricted to PC versions of games.
PC Installation
First, ensure that Cyber Engine Tweaks are installed; this is a prerequisite for the Simple Menu to function properly. The version of Cyber Engine Tweaks must meet or exceed the minimum required for Simple Menu to work. To check the version required, visit the Simple Menu’s description page.
- Step 1: Create a ‘mod’ folder in your Cyberpunk 2077 installation directory (Cyberpunk2077/archive/pc) if it doesn’t exist.
- Step 2: Download the Simple Menu mod files from a trusted source such as Nexus Mods.
- Step 3: Extract the downloaded mod files into the newly created ‘mod’ folder.
Remember to verify that the mod files are placed correctly within the ‘mod’ directory to avoid any issues during the game’s launch.
Console Installation
Modding is currently not supported on console versions of Cyberpunk 2077. To use mods such as Simple Menu, you would need to be on a PC. Modifications for console games typically breach the Terms of Service of the console and can lead to bans or other penalties.
Setting Up Cyberpunk 2077 Simple Menu
Before you install Cyberpunk 2077 Simple Menu, ensure you have access to the game’s mod directory and you are ready to proceed with the installation of the Simple Menu mod.
Accessing Game Mods
To access the game mods for Cyberpunk 2077, you need to locate the directory where your game is installed. Typically, this will be:
C:\Program Files (x86)\Steam\steamapps\common\Cyberpunk 2077\
Make sure that the path you navigate to contains the subfolders \bin\x64\, as this is where the plugins for mods are stored.
Installing the Cyberpunk 2077 Simple Menu Mod
To install Cyberpunk 2077 Simple Menu, follow these steps:
- Download Simple Menu from a reliable modding community, such as Nexus Mods.
- Extract the mod archive to a known location on your computer.
- Copy the extracted files directly into the Cyberpunk 2077 mods directory, which should look like this:
- [GameInstallRoot]\bin\x64\plugins\cyber_engine_tweaks\mods\SimpleMenu\
- Once you have placed the files in the correct directory, start the game; you should see a notification indicating that Simple Menu has been loaded if the installation was successful.
Ensure that Cyber Engine Tweaks is also installed, as Simple Menu relies on it to function properly.
Read Also: Icy Metal BG3: How to Find and Use it?
Post-Installation Checks
After installing the Cyberpunk 2077 Simple Menu, it’s essential to run through some post-installation checks to ensure everything is functioning correctly.
Verifying Game Files
Before you launch Cyberpunk 2077, verify the game files to confirm that the mod installation has not corrupted any existing files.
In the game’s library, right-click on Cyberpunk 2077 and select ‘Properties,’ followed by ‘Local Files,’ and then ‘Verify Integrity of Game Files’.
This can help you avoid potential conflicts or crashes that could arise from corrupted files.
Running the Game for the First Time
When you run Cyberpunk 2077 for the first time after mod installation, observe the game’s behavior closely. If the Simple Menu appears and functions as expected, the installation is successful. However, if the game does not start or if you encounter errors, you may need to revisit the installation steps or consult the mod’s documentation, like checking the Simple Menu’s own log file for insight into any issues.
Troubleshooting Cyberpunk 2077 Simple Menu
When installing Simple Menu for Cyberpunk 2077, you may encounter specific issues that prevent the mod from functioning properly. This section guides you through common problems and solutions, as well as how to seek further help if needed.
Common Installation Issues
- Check Cyber Engine Tweaks: Ensure that you have the minimum version of Cyber Engine Tweaks installed as required by Simple Menu.
- Mod Directory: Confirm that Simple Menu’s files are placed in the correct directory: [Cyberpunk 2077 Root]\bin\x64\plugins\cyber_engine_tweaks\mods\simplemenu.
- File Permissions: Verify that you have write permissions for the folders where Cyberpunk 2077 and Cyber Engine Tweaks are installed on your system.
Contacting Support for Help
If the above steps do not resolve your issues:
- Document the Problem: Prepare a description of the issue, screenshots if applicable, and any log files. Simple Menu’s log file is found at simplemenu.log in the Simple Menu directory, while Cyber Engine Tweaks logs at cyber_engine_tweaks.log.
- Reach Out: Use the Nexus Mods forum for Cyberpunk 2077 for community assistance, or contact the creators directly through the mod’s Nexus Mods page for dedicated support.
Read Also: BG3: Unable to Create a Working Story (Fix)
Frequently Asked Questions
What steps are needed to install the Simple Menu mod for Cyberpunk 2077?
Firstly, ensure you download the Simple Menu mod from a reputable source like Nexus Mods. Proceed to extract the mod files into the game’s installation directory, specifically within the ‘bin/x64/plugins/cyber_engine_tweaks/mods’ folder.
Why isn’t the Simple Menu mod appearing after installation in Cyberpunk 2077?
If the Cyberpunk 2077 Simple Menu does not appear post-installation, verify the mod files are correctly placed in the ‘Cyberpunk 2077’ folder hierarchy. The necessary path is ‘[Cyberpunk 2077 Root]/bin/x64/plugins/cyber_engine_tweaks/mods’.
How can I open the Simple Menu in Cyberpunk 2077 using the hotkey?
To access the Simple Menu in-game, press the designated hotkey, which defaults to ‘B’. You can change this key by editing the ‘hotkeys.json’ file within the mod folder.
What are the requirements for running the Cyber Engine Tweaks needed for Simple Menu?
The Simple Menu mod relies on Cyber Engine Tweaks. Ensure you install the correct version of Cyber Engine Tweaks. The specs are detailed on the Simple Menu’s Nexus Mods page under the Requirements section.
How can I fix issues with Cyberpunk 2077’s Simple Menu not functioning properly?
When facing any operational hiccups with the Simple Menu, consult the mod’s log files to diagnose the problem. The log is located in the ‘simplemenu’ subfolder where you installed the mod. It may hint at conflicts with other mods or missing prerequisites.
What should I do if the console doesn’t appear when using the Cheat Menu mod for Cyberpunk 2077?
Should the console not display using the Cheat Menu, you likely need to press the grave accent (`) key, also known as the tilde key, to bring it up. If it still doesn’t appear, checking the installation tutorial for proper setup steps may resolve your issue.


